KMBOX NET Setup
This detailed guide will help you properly set up KMBOX NET for operation in your system.
Device Connection
Connect the KMBOX NET device using two USB cables to your computer or computers.

After connection, an image will appear on the Kmbox-Net screen.

Driver Installation
Install the WCHUSBNIC driver on the second computer (Second PC in picture #1).
Download driver: mega.nz/file/vJM1gBaa#0XN6gv7YYXqRI5gfyX8fLvzcvsm53yES3FpOaQA6L44
After downloading and installing the driver, you need to restart the second computer.
⚠️ Important
Make sure your main and second computers are connected to the same local network (for example, your home Wi-Fi network).
Network Adapter Setup
Step 1: Opening Control Panel
Open Control Panel.

Step 2: Going to Network Section
Go to "Network and Internet".

Step 3: Network and Sharing Center
Go to "Network and Sharing Center".

Step 4: Changing Adapter Settings
Go to "Change adapter settings".

Step 5: Finding Network Adapter
Find the adapter named USB2.0 Ethernet Adapter.
To find the required adapter faster, you can temporarily disconnect and reconnect KMBOX NET — it will appear in the list again.
Step 6: Adapter Properties
Right-click on USB2.0 Ethernet Adapter and select "Properties".

Step 7: Disabling IPv6
In the components list, find Internet Protocol Version 6 (TCP/IPv6) and disable it.
Step 8: Enabling IPv4
Find Internet Protocol Version 4 (TCP/IPv4) and enable it.

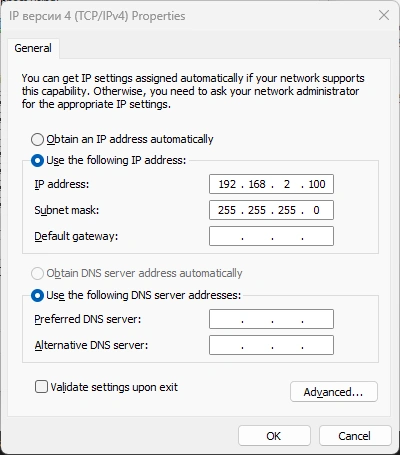
Step 9: Configuring IPv4
Select Internet Protocol Version 4 (TCP/IPv4) and click Properties.

Step 10: Setting Network Parameters
Set the parameters exactly as specified below:
- IP address:
192.168.2.100 - Subnet mask:
255.255.255.0 - Leave other fields empty
- Click "OK"
Testing the Connection
To confirm that KMBOX NET is working correctly, open Command Prompt and run:
ping 192.168.2.188
If the device is set up correctly, you will see replies back from KMBOX NET.
Setup Completion
✅ Done
Kmbox-Net is configured and ready for use. Next, you need to enter values from the device screen into our program.